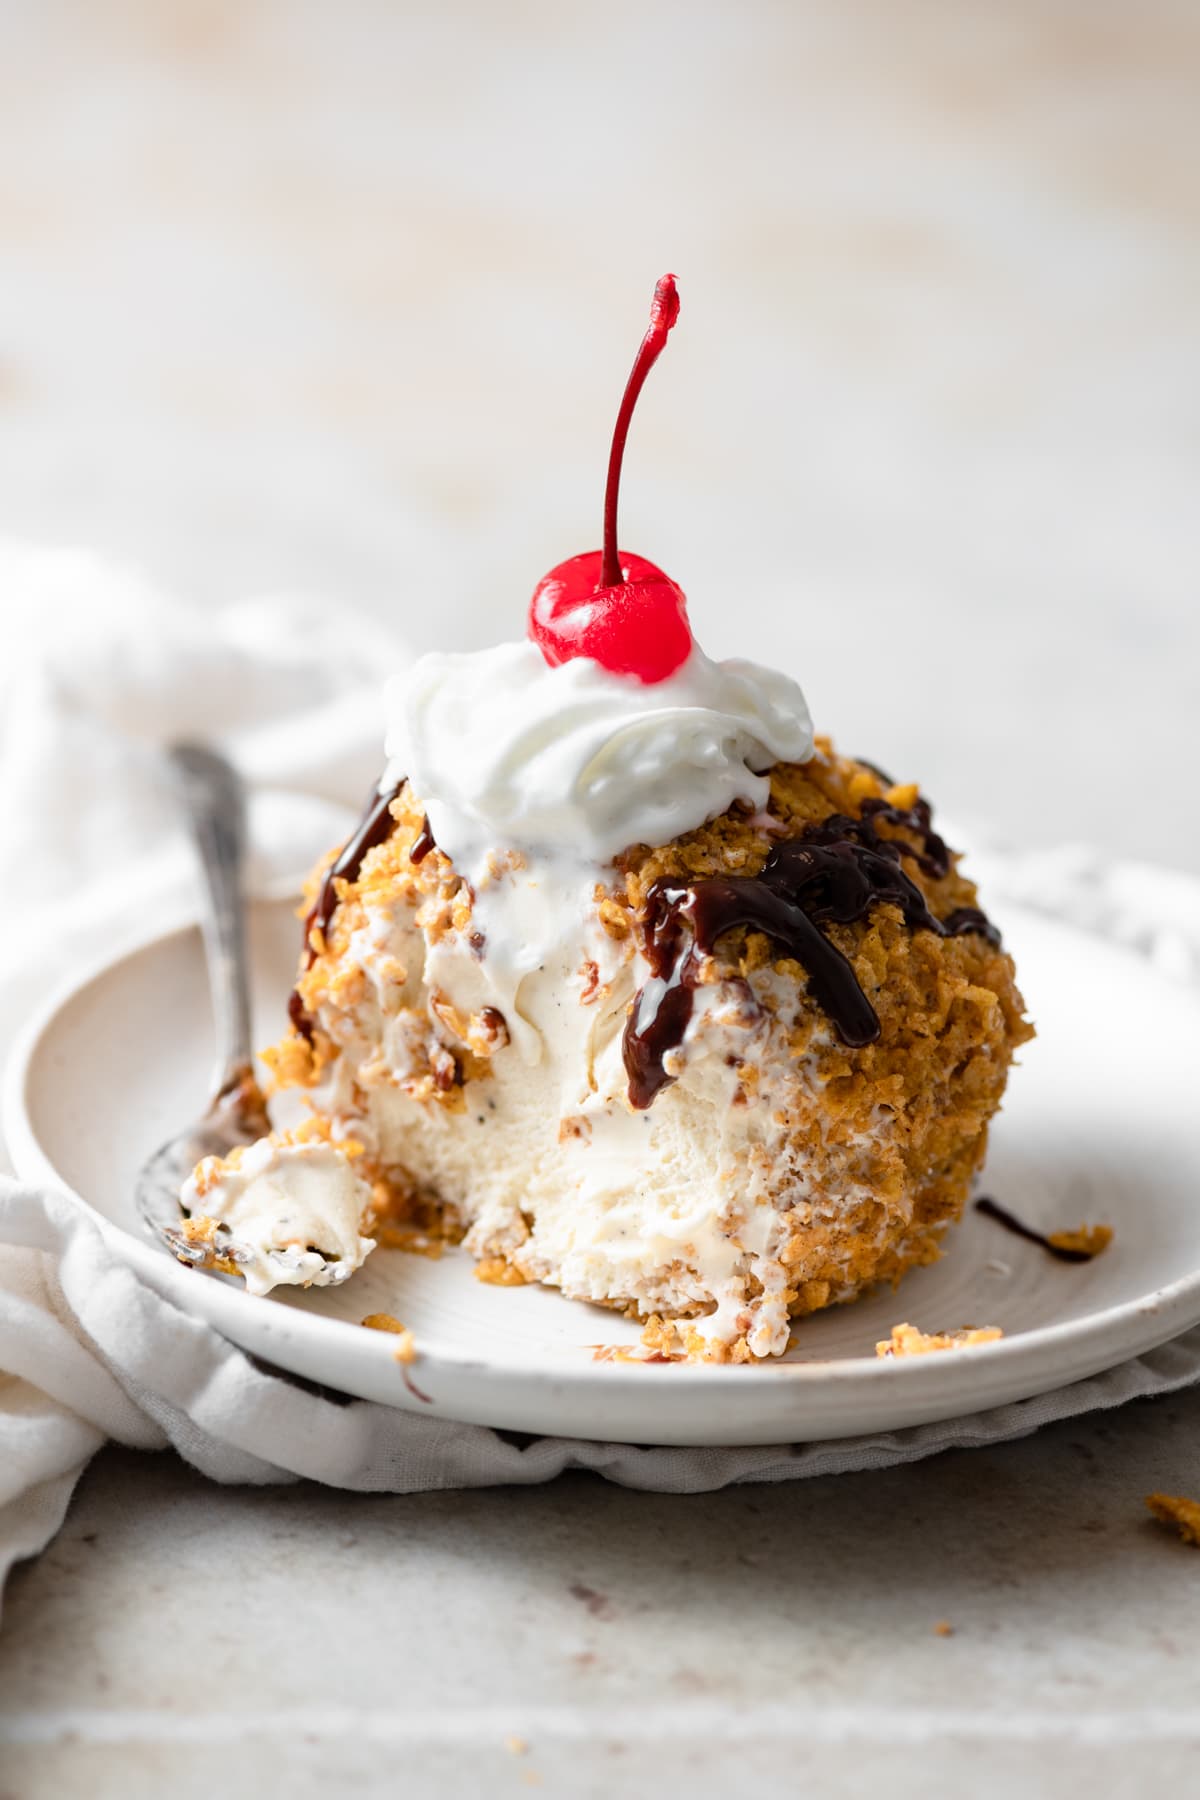
Imagine a dessert that defies expectations: a golden, crunchy exterior giving way to a luxuriously smooth, icy-cold center. This isn't magic; it's the culinary marvel that is fried ice cream. Often associated with exotic restaurant experiences, this delightful treat is surprisingly accessible for the home cook, provided you understand the simple yet crucial principles behind its creation. The secret lies in a fascinating interplay of extreme temperatures and precise timing, ensuring every bite delivers that irresistible contrast: crispy warm on the outside, exquisitely creamy cold on the inside.
While the exact origins of fried ice cream are shrouded in delicious mystery, its universal appeal is undeniable. Whether you first encountered it at a bustling fair, a beloved Chinese restaurant, or a lively Mexican eatery, the concept remains the same: a protective, flavorful coating rapidly cooked to a golden crisp, creating a perfect thermal shield for the frozen delight within. Ready to unlock the secrets to making this show-stopping dessert yourself? Let's dive in.
Mastering the Art of Fried Ice Cream: The Hot & Cold Secret
At its heart, the perfection of fried ice cream hinges on three non-negotiable elements: impeccably cold ice cream, a robust and firmly packed coating, and fiercely hot oil. These three factors work in concert to create the desired textural and thermal contrast. The coldness of the ice cream and the insulating properties of the coating protect the interior from melting during the brief, high-heat frying process. Meanwhile, the very hot oil ensures the coating crisps up almost instantly without penetrating deeply enough to turn your ice cream into soup.
The Foundation: Perfectly Frozen Ice Cream Spheres
Your journey to perfect fried ice cream begins long before the oil heats up. The quality and preparation of your ice cream are paramount. For the best results, opt for a high-quality, full-cream ice cream. Its richer fat content helps it maintain its structure better under stress. Avoid low-fat or airy ice creams, as they tend to melt too quickly.
- Scooping & Shaping: Use a standard ice cream scoop, or for precise portions like those favored in traditional recipes, a 125ml measuring cup can create consistent balls. Scoop firmly, pressing the ice cream against the sides of the scoop to eliminate air pockets. Once scooped, quickly roll the ice cream in your hands to form tight, smooth, dense spheres. Any loose spots or air bubbles can be weak points during frying.
- The Deep Freeze: This is a critical step. Once shaped, place your ice cream balls on a baking sheet lined with parchment paper, ensuring they don't touch. Transfer them to the freezer for a minimum of 4-6 hours, or ideally, overnight. They must be frozen rock-solid – so hard you could almost bounce them (but please don't!). This extreme cold is your primary defense against melting.
Crafting the Ultimate Crispy Coating
The coating is the unsung hero of fried ice cream, providing both flavor and the crucial insulation. It needs to be substantial enough to form a protective barrier but also delicious when fried to a golden crisp. There's a delightful variety of options for your coating:
- Traditional Breadcrumbs: Fine, dry commercial breadcrumbs are often recommended for their consistent texture and ability to form a compact layer. Panko breadcrumbs also work wonderfully for an extra light and crispy finish.
- Crushed Cereals: Cornflakes are a classic choice, offering a satisfying crunch. Simply crush them by hand or in a food processor until they're coarse crumbs. Other cereals like Rice Krispies or even granola can offer interesting textural variations.
- Crushed Cookies: For a decadent twist, consider crushed vanilla wafers, graham crackers, or even shortbread cookies. These add an extra layer of sweetness and flavor.
- Batter Variations: While less common for home preparation, some variations utilize a light tempura batter, creating a delicate, puffy shell.
Regardless of your choice, the application process is key to a robust coating. Set up a dredging station: one bowl with beaten egg whites (or whole eggs for richer color), and another with your chosen coating. A pro tip: use one hand exclusively for dipping in the egg and the other for rolling in the crumbs. This keeps your hands cleaner and prevents the dreaded "claw of doom" (a hand caked in sticky batter and crumbs).
- Dip the rock-solid ice cream ball into the egg mixture, ensuring it's fully coated.
- Immediately transfer it to the coating bowl. Roll and press the crumbs firmly onto the ice cream, covering every inch. The denser the coating, the better the insulation.
- For extra security and crispness, consider a double-coating: repeat the egg dip and crumb roll process.
- Place the coated balls back on the parchment-lined tray and return them to the freezer for at least another 2-3 hours (or overnight). This ensures the coating adheres perfectly and the ice cream is ultra-cold, ready for its hot oil plunge.
The Moment of Truth: Deep-Frying for Deliciousness
This is where the magic happens, but also where speed and safety are paramount. You'll need a heavy-bottomed pot or a deep fryer, and a neutral oil with a high smoke point, such as vegetable, canola, peanut, or grapeseed oil. Fill your pot with enough oil to submerge the ice cream balls completely.
- Optimal Oil Temperature: Heat the oil to 350-375°F (175-190°C). A kitchen thermometer is invaluable here. If the oil isn't hot enough, the coating will absorb too much oil and become greasy, and the ice cream will melt. If it's too hot, the coating will burn before the ice cream warms up inside.
- Quick Fry, Quick Serve: Carefully lower one or two fried ice cream balls into the hot oil using a slotted spoon or spider. Do not overcrowd the pot, as this will drop the oil temperature. Fry for a mere 10-20 seconds, or just until the coating is golden brown and crispy. The goal is to cook the exterior as quickly as possible without allowing the heat to penetrate the core.
- Safety First: Always exercise extreme caution when working with hot oil. Keep a lid nearby to smother any potential oil fires, and never leave heating oil unattended.
Immediately remove the fried ice cream with a slotted spoon and place it on a paper towel-lined plate to drain any excess oil. Serve without delay to enjoy the perfect contrast.
Elevating Your Fried Ice Cream Experience: Toppings & Twists
While a perfectly executed fried ice cream is a star in itself, the right accompaniments can elevate it to an unforgettable dessert:
- Classic Pairings: A dollop of freshly whipped cream, a drizzle of golden honey, and a scattering of bright red cherries create a timeless, elegant presentation.
- Sweet & Spicy: Take inspiration from its popularized Mexican-American versions by dusting your fried ice cream with a sprinkle of cinnamon sugar.
- Chocolate Lover's Dream: A generous pour of warm chocolate fudge sauce or a dusting of cocoa powder is always a hit.
- Caramel Indulgence: A rich salted butterscotch sauce (perhaps with a nip of Cointreau, as some Aussie-Chinese classics suggest) adds a layer of sophisticated sweetness.
- Fruity Freshness: A berry compote or fresh fruit salsa can provide a welcome tart counterpoint to the sweetness.
A Taste of History: The Journey of Fried Ice Cream
The concept of encasing ice cream in a protective layer and briefly exposing it to heat isn't new. While its precise invention is debated, early references trace back to the 19th century in the United States. Thomas Jefferson, for instance, is noted for serving ice cream balls in warm pastry in 1802. Later, by the late 1800s, it's believed to have been a novelty, possibly even at the 1893 Chicago World's Fair, though definitive proof is scarce. Some culinary historians even point to precursors like the Baked Alaska, popularized in 1867, which involved ice cream encased in meringue and briefly broiled. For a deeper dive into the intriguing lore surrounding this dessert, explore The Debated Origins of Fried Ice Cream: From Jefferson to Chi-Chi's.
Interestingly, despite its debated American invention, fried ice cream gained immense popularity in the United States, particularly after the 1970s, when restaurant chains like Chi-Chi's introduced a cinnamon-dusted version, leading many to perceive it as an authentic Mexican dish. Beyond North America, variations have appeared in diverse culinary landscapes, from Japanese tempura ice cream to other Asian-inspired contexts, highlighting its remarkable adaptability as a "hot and cold fusion" dessert. Discover more about its worldwide adaptations in Fried Ice Cream: A Global Dessert Journey of Hot and Cold Fusion.
Making perfect fried ice cream is a testament to culinary ingenuity and a delightful challenge for any home cook. By following these steps – ensuring your ice cream is impeccably frozen, your coating is firm and thick, and your oil is fiercely hot – you can confidently create this sensational dessert. The anticipation as you take that first bite, experiencing the immediate crunch of the warm exterior giving way to the cool, creamy interior, is truly unmatched. So, gather your ingredients, follow these tips, and prepare to impress your guests with this extraordinary treat that consistently delivers a burst of textural and thermal delight!
